Pros and Cons of Approval Workflows in Purview Data Governance

I’ve been doing some work with Purview Data Governance recently including evaluating the new workflow based approvals released into preview which can be used to add a customised approval process to the publication of data products and glossary terms. The customer on the project kindly gave me permission to share some of the insights and so here are my thoughts on this feature.

This is a feature that’s been missing from Purview for a while. It was built into the “classic” interface that was left behind by Microsoft at the tail end of 2024 for the new interface we have now. I don’t have the inside scoop on the reasoning behind the interface change but reading between the lines Microsoft had walked themselves into a few dead ends with the old interface that needed to be backed out of before they could start to flesh out the feature set and start moving forwards again.

Workflows were one of those lost features. A neat and relatively sophisticated way of defining control flows for approval, it looked a lot like Power Automate but wasn’t actually Power Automate i.e. there was an impossible task in keeping up with a key Microsoft product and replicating its features in parallel. The switch to the new interface backed out of that challenge and a year on we now have first sight of workflows in the new world.

First the good news, workflows are back and functional in preview. Microsoft have done the right thing and much like in a classic X vs Y comic book story our heroes have reached the point where they settle their differences and team up against the true enemy, in this case poorly supervised data stewardship. Workflows in the new Purview Data Governance are effectively a window in to Power Automate. It’s early days but the long term promise of the roadmap is that anything you can deliver with Power Automate will be available to you triggered from within Purview.

And the bad news? Don’t panic, the less good news isn’t bad it’s simply that on the spectrum of preview release completeness this is leaning towards the sneak peek/proof of concept side of the rather than a ready to go fully fledged solution. It’s useful right now but there are significant limits on what you can achieve. Let’s take a look at the features we have before coming back to what those limits are, how they might affect you and if you should dive in with workflows right now or wait with an eager eye on future releases.

Creating a Workflow

I’m going to use approvals for glossary terms as an example. Data Product approvals are essentially the same but for a different object. Access requests which were already a feature in the new interface can now been seen as a workflow as well as a baked in part of the interface, these are a little more complex so we’ll come back to them in the future.

Step one is to create the workflow. If you’re a Purview regular you’ve probably already seen the feature appear in the menu:

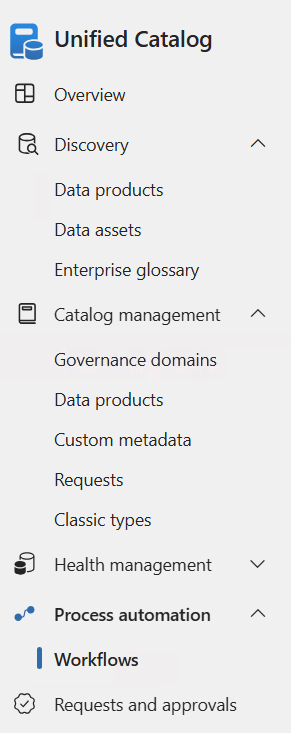
A whole new page of features, head in and select the + to create a new one, pick Catalog curation and Term publish as we’re creating this for term approvals after that we’re straight in with a template to work with:

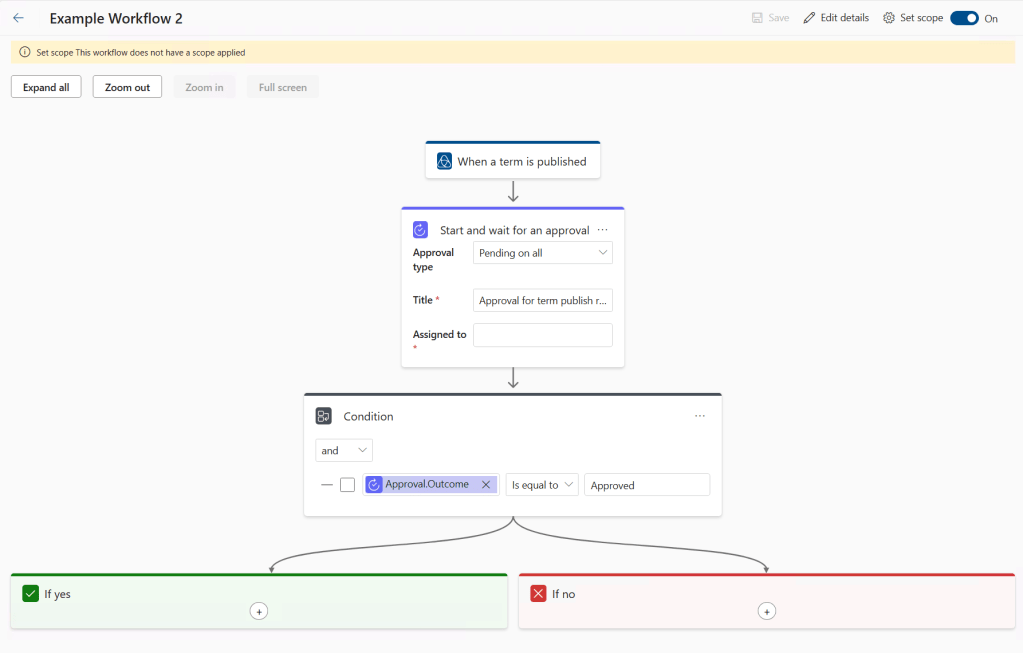
But first things first we need to define a scope. Click that cog at the top right and you’re presented with a list of your governance domains, ticks in here define which domains this workflow will apply to so there’s room to have different processes for different areas of the business.

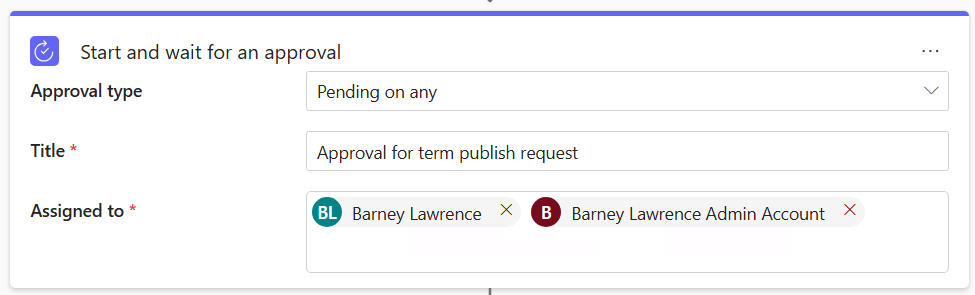
Next up to fill out the details. We sadly don’t have a lot of options here. Start points are locked in and then we follow through to the approval task which gives us the option to require any or all in an assigned list to approve the request. It’s the usual Entra pick list that you’ll encounter elsewhere and you can choose as many names as you like. You can pick groups but I’ve not had the opportunity to test the behaviour of them just yet (when I tested this last week groups weren’t selectable).

One potential issue with this feature is all you see is the display name of a person, there’s no route to hover over two people with the same name and see their e-mail. Up until last week the names on my standard and admin accounts were the same, there was no way of knowing which was which:

At its simplest that’s it, you can create your workflow and you’re ready to go but there’s a bit of room for customisation. We could expand the workflow to have another layer of approval and it’s also possible to add in automated e-mails. Here I’ve added a notification to the no path so that something is sent when approval is declined.

Note that we have no variables in the examples above. That’s because there aren’t any available. We’ll come back to this in the wrap up but this is probably the biggest hurdle in taking up use of workflows in their current form.

Using a Workflow

With the workflow created we can use it. Crating a new glossary term in an in scope domain now triggers the approval workflow when you try and publish it. You’ll get a blink and you miss it alert telling you the workflow has been triggered and unfortunately there’s no visible sign after that of there being an approval in progress.

Try to edit or publish again though and you’ll see something like this:

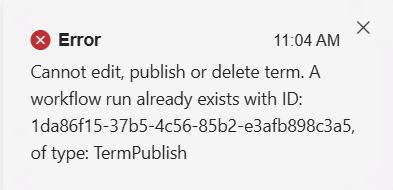
You can’t edit and edit again so it’s useful to know why but the message isn’t as friendly as I’d like.

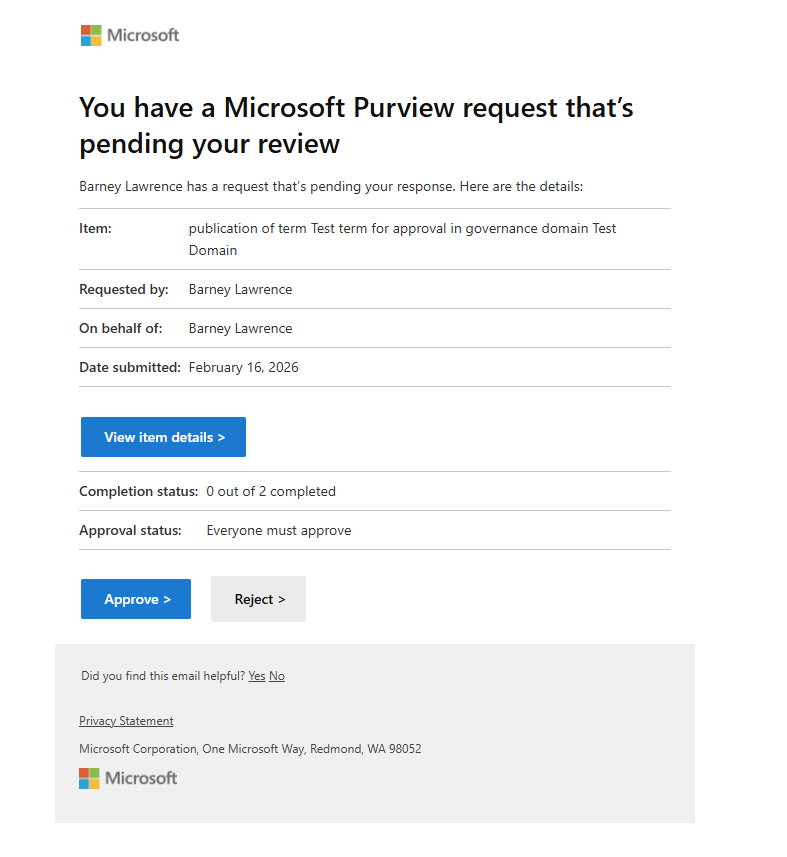
Those on the approval list will receive an e-mail with a link to the item to approve or reject button:

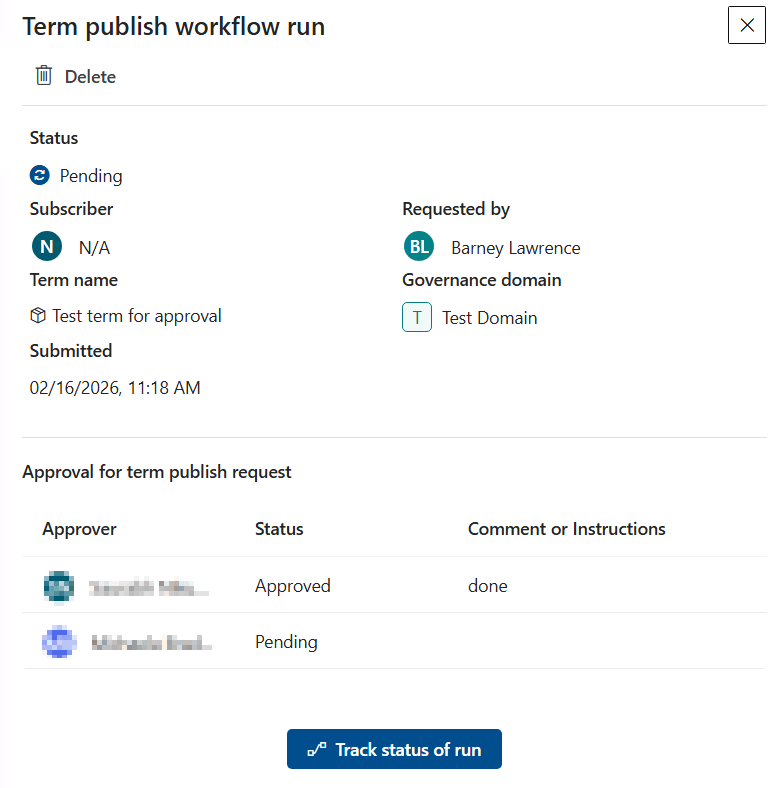
You can track progress inside Purview under Requests and Approvals:

Once all the approvals are in place the glossary term will be published with the details.

If someone declines then the ‘If no’ branch of the flow is triggered and the workflow closed. The term isn’t published and stays as is (note the rejection only stops the publication, if someone unpublishes and makes a bad edit that’s rejected then the term stays unpublished and I don’t see any route to roll back to the previous version.

Conclusions

First off it’s important to reiterate that it’s great to see this feature in place. The foundations have been laid and as long as Microsoft follow through on the roadmap (with a few extras) then the feature should deliver everything needed of it. I’m confident that workflows will see development and reach something like their ideal state in time. If I had to give an edge of caution to that conclusion I would point out that while there is delivery against needed features for Purview Data Governance I’ve seen a lot of churn in the roadmap over the last year. Many features have slid back on delivery dates as other priorities arise and more than one much desired feature has remained elusively out of reach (pointedly eyes lineage in Fabric).

As is however there are limits to this initial version which may mean you want to hold off a little while. Issues so far that I’ve identified are as follows.

Little flexibility. The lack of variables to either access parts of the flow or to give context to the request are missing. If I want to e-mail the person requesting the publish either on completion or rejection I can’t because the e-mail action only takes a hard coded name. Similarly I have to hard code the approval list. If it’s a central team approving everything that’s ok but if you want the owner of each domain to handle approvals you need a workflow per domain to add the right name (and good luck when job roles change). What I’d like to see is the ability to create a generic workflow that picks out names from existing metadata e.g. the owner on the domain being published to or pulling a list from a custom attribute.

I also don’t see space at present to have a two tier set of workflows, they apply to everyone or no one so there’s no room for approval on your general users but instant publication from your product owners for example.

Low visibility.

  • As I commented on above if someone has made an edit and is awaiting approval it’s not entirely clear to another user who might also want to make a change.
  • You have to attempt a publish before you know you can’t publish.
  • The details in the requests and approvals are exactly what I’d like to see but they are well hidden from the average user.
  • There’s no status updates to the person publishing, no e-mail on completion it just happens once the approvals are in place.
  • The same for rejections, workflow finished and the term just stays unpublished with no warning.

No overrides. You can delete the instance of the workflow but that’s it. In my testing I ran a test with the all to approve option and one person on the list was on holiday. That approval was locked down for a week. Either waiting or manually amending is an option but in a big organisation with a lot of changes that’s going to be tough to keep up with. In practice you are probably limited to using the ‘Pending on any’ option and listing multiple people.

Invisible concepts. More of a consequence of how Purview handles the publishing of concepts than something caused by workflows but it will be exacerbated. To edit something in Purview you must first unpublish it. At which point it becomes invisible to the default user until republishing. The approval workflow puts a delay on that re-publishing, without a workflow then a quick edit for spelling could take minutes. If approval is needed then a key asset might be hidden for days.
As of now there’s no facility to propose an edit and keep the old version visible while awaiting approval. This would be a great feature to have and is a well established approach elsewhere in tech (e.g. pull requests into code branches in a repository).

You can still delete. I may need to test further with more limited permissions on this one but it appears unpublishing and deletion of a glossary term is not subject to approval. Workflows give you control over changed terms but as of now this is not a feature that will protect you from a malicious actor who wants to cause damage to your catalogue. Potentially this will put a limit on how far you’re willing to open up access to create and modify glossary terms or data products.

Should You Start Using Workflows?

I’m a consultant so the answer to this question was inevitable from the start – It depends.

Workflows as they are now are usable within their current limits and if you really need the feature (say for a federated model where business users can create new terms but you absolutely must have central approval prior to publishing) then jump right in.

You will however find yourself limited. You’ll need to look to one single cross organisational set of approvers on a single workflow or be set for a lot of creation and maintenance time on a domain by domain basis. Expect a lot of communication coming through from end users who aren’t clear where things are on the approval process.

If you’re on the fence or don’t think that this feature is quite ready for you just yet I’d still suggest you give it a trial in a nice contained test domain just to ger familiar with them. Over time workflows are going to become more and more central to how we use Purview and having a solid example in place to come back to as features evolve will benefit you in the long term.

A big thanks to the customer and governance team members who helped me test these features but for contractual reasons must remain nameless. It was much appreciated.

How to fix the error “cannot create property ‘groupid’ on string ‘” In Azure Data Studio

This is a solution to a bug I’ve encountered in Azure Data Studio when trying to create new connections. that leads to an error message of cannot create property ‘groupid’ on string ‘.

File this post under “things I couldn’t find a neat answer to in Google so I figure I’d best create a page for it”.
I hit this issue today whereby I couldn’t create new connections in Azure Data Studio. Connecting a single query worked, I was confident I had the needed permissions the (same connection was working in SSMS) but the option to create a whole new connection so I could make it appear in the servers list failed every time.
Even a full uninstall and re-install of Azure Data Studio failed to fix the issue, something was being persisted outside of the normal stored data.

Careful reading of the error message led me to noticing that the extended details of the error were referring to a login for the server on a past project I’d deleted, which in turn set me digging in to the configuration options and finally to a fix. Here are the steps I followed.

Firstly open up settings either from the cog icon in the bottom left of the ADS window or through the ‘ctrl + ,’ shortcut.

In the search box for settings enter ‘connection groups’ which should lead you to a setting named ‘Datasource: Connection Groups’ and a hyperlink to eddit some settings json. Click on this and you’ll see some details like the following.

The blue highlighted section is where your connection data lives (I’ve deleted the actual data so you’re not tempted to peek at my test servers). For me there was an additional orphaned block giving a group but no connection details the highlighted XXXXX below had some metadata including the login for the long dead project that had appeared in the error.

Deleting out the group block and saving the config restored my Data Studio to functionality and once it was gone I could create a new connection in a new group without issue

T-SQL Tuesday #168 – FIRST_VALUE, LAST_VALUE and NULL Handling

FIRST_VALUE and LAST_VALUE had limited uses when they were first released to the world back in 2012, but with the introduced of the ability to ignore nulls in SQL Server 2022 they become a lot more useful. Let’s take a look at some examples of why.

TSQL Tuesday Logo

For this month’s T-SQL Tuesday Steve Jones (blog|twitter) asked us to share something neat using window functions. Who could resist?

Not me for certain. As a self confessed window function addict and regular presenter on the topic I couldn’t stop myself from sharing something.

Serendipitously I’ve been writing a query this week, not just with a window function but with window function features newly introduced with SQL Server 2022 and now available in Azure SQL DB and Managed Instances. What follows is a simplified and sanitised version of the code. Dial your server up to compatibility level 160 if you’d like to follow along!

The Problem With FIRST_VALUE and LAST_VALUE

FIRST_VALUE and LAST_VALUE functions were first introduced back in SQL Server 2012 but they didn’t see much use (or certainly not in my work) for a couple of reasons. Firstly because they didn’t do much with the default window window ranges, without dipping in to the ROWS or RANGES feature LAST_VALUE simply returns the values in the current row. More critically, as far as both functions were concerned the definition of “value” included null.

Take the table below, we record a value over time but often no record is available and we hit a NULL in the list. If I’m looking at row 12 I probably want my last value to be green from back on row 9 but depending on my window clause I’m likely to get either the value from row 12 (null), row 11(null) or possibly row 14 (you guessed it, null). Finding the last non null value in a table was possible but it wasn’t exactly straight forwards and would likely involve a couple of hours buried in Itzik Ben-Gan’s blogs. If you felt particularly daring you might end up taking some some dubious liberties with the query engine (hands up who remembers what a quirky update is).

Finding The Last Non Null Value – Enter SQL Server 2022

With SQL Server 2022 came a much requested additional feature added from the SQL standards – IGNORE_NULLS. You can probably guess what it does. Drop in IGNORE_NULLS after your function and you can blur the non null values over those gaps giving us results like this:

Definitely useful in itself where data is sporadic and you want to see whatever the most recent recorded value, in practice you’re likely to do this over multiple columns. The code for the above looks like this. I’m using the new WINDOW clause to define the window to act over. This has little impact on the size of the code for this example but if you need multiple columns with the same window it will save a lot of unneeded, messy repetition.

SELECT No, Colour,
LAST_VALUE(Colour) IGNORE_NULLS
	OVER MyWindow AS LAST_VALUE,
FROM #MyData
WINDOW 
MyWindow AS (
ORDER BY No
ROWS BETWEEN
UNBOUNDED PRECEDING
AND CURRENT ROW
)

Pivoting Data Over Time

But wait there’s more as they say in the adverts. LAST_VALUE is an aggregate function which means you can combine it with another of my favourite SQL techniques the crosstab/pivot query. Let’s see that in action.

I’m not a big fan of T-SQL’s PIVOT function, it’s too limiting and I can never remember the syntax. My preference has always been to embed an IIF statement inside an aggregate in order to control when the aggregate sees values and when it sees a NULL. Let’s look at an example building up in steps.

The below query takes a set of colours recorded over time. Applying an IIF for each colour we filter the results so we have a column that either contains the requested colour or a null value.

SELECT RecordDate, Colour,
IIF(Colour='Red’
	,RecordDate,NULL) 
	AS RedOnly,
IIF(Colour='Green’
	,RecordDate,NULL) 
	AS GreenOnly,
IIF(Colour='Blue’
	,RecordDate,NULL) 
	AS BlueOnly
FROM #MyData

Giving us a result set looking like the one below. You may notice that each column looks a lot like our single column example from above.

So let’s combine the two and wrap those IIFs inside a LAST_VALUE.

SELECT RecordDate, Colour,
LEAD(RecordDate) 
	OVER MyOrder AS NextDate,
LAST_VALUE(
	IIF(Colour='Red',RecordDate,NULL)
	) IGNORE NULLS
	OVER MyWindow AS LastSeenRed,
LAST_VALUE(
	IIF(Colour='Green',RecordDate,NULL)
	) IGNORE NULLS
	OVER MyWindow AS LastSeenGreen,
LAST_VALUE(
	IIF(Colour='Blue',RecordDate,NULL)
	) IGNORE NULLS
	OVER MyWindow AS LastSeenBlue
FROM #MyData
WINDOW 
MyOrder AS (
	ORDER BY RecordDate
),
MyWindow AS (
MyOrder
	ROWS BETWEEN
	UNBOUNDED PRECEDING
	AND CURRENT ROW
)

Giving us a final set of results looking like this.

Now every gap is filled and by sneaking in a lead function on the date field we have a set of data with continuous date ranges showing the last seen date for every colour over time.
There’s plenty of room for variations around this concept, anywhere that there’s gaps in records or intermittent data flows this approach can come to your rescue. I’d love to hear about other use cases people have encountered. Feel free to chip in down in the comments.

PASS Summit Favourites (Part 1 of Many)

PASS Summit has been great this year and I’ve been honoured with the chance to both attend and speak.
This post is my ongoing highlights with links out to the videos of sessions I’ve enjoyed and learned from.

10 Productivity Tools

Rob Sewell and John Morehouse take 10 minutes to race though 10 useful tools to help with your development. A really fun session to watch and by the end you’ll certainly be heading towards the download page for a few of these suggestions.

10 minutes into SQL Notebooks

Another 10-minute session, this time from Deepthi Goguri on notebooks. Summary notebooks are a great way to merge code, results and explanations, you should probably be using them yourself. Watch to find out why.

An Introduction to Delta Lakes and Delta Lake-Houses

Paul Andrew knows both his lakes and his houses. This is the best primer on the subject I’ve watched so far. Great to watch both for those new to the subject and those looking for a good clear introduction to share with others.

Business Benefits of Good Governance

Victoria Holt finds Data Governance exciting and I’m really glad there are people that do, it’s important! Well worth a watch to find out why and what to do about it.

MS SQL New Functions, Syntaxes, Tips & Tricks

If you know me then you probably know that I’m a big T-SQL fan and that I’ll be in my element with a session title like the one above. Damir Matešić nails it in this session covering the key new T-SQL features added since SQL 2016.

Modern Data Warehousing with Azure Synapse Analytics

A few steps up I said Paul Andrew had the best primer on Lakes and Lakehouses. The good news for us is he has competition! Unfortunately there are technical issues with the video at present (it cuts off at about 13 minutes) but having listened to Ginger Grant’s live Q&A session I’ sure that as soon as it’s fixed her session on a similar topic will be just as good.

Practical Experiences from Working with Synapse

Sessions that give real world experience are always valuable and this session from Brian Bønk and Mathias Halkjær shows why. Synapse can be intimidating and stories from those who have hit pain points and explaining how to avoid them are always welcome.

Data Transformation Magic with Power Query

For me personally this session didn’t teach me many new tricks, but it was a really good, worked example of how to put together a data extract with Power Query. I can see myself sharing this with others as a resource if/when it comes out from behind the Summit paywall. Watch it here.

Building a Regret-free Foundation for your Data Factory

I didn’t know I needed Meagan Longoria’s session until I started watching it but it’s one I’m sure I’ll be coming back to over and over as I start on new projects. One of the best things a session can do is provide warnings from past experience to help others avoid mistakes they’ll later regret. This session is over an hour’s worth of suggestions to make sure that the next person (usually future you) doesn’t regret what you did in Data Factory.

The Dream Team: Synapse Analytics Serverless SQL Pools and Pipelines

Andy Cutler takes us through how to make the most of serverless pools and pipelines in Synapse. As an old school SSIS and SQL Server type BI developer who’s starting in on Synapse projects I can see myself having this session running on repeat over the next few weeks.

An Introduction to Window Functions

What’s this Barney Lawrence guy doing on this list? Perhaps it’s a little self-indulgent but presenting at PASS Summit is always going to be a highlight and I’m not going to miss a chance to promote my own session. Feedback has been good so far and I’m pleased with what I’ve produced.

And More…

I aim to add to this list over the next few weeks. There are several sessions I haven’t had time to watch yet that I’m sure will be brilliant and PASS have promised to make available many of the sessions that weren’t live streamed in the near future.

SQL Window Functions

Links to resources related to Window Functions and my sessions on them.

This page is here to act as an index to material I’ve produced relating to window functions.

GitHub: https://github.com/BarneyLawrence/Sessions-SQL-Window_Functions
My main repository, this holds PowerPoint presentations, sample queries and workbooks either used in sessions, to back them up or to develop the examples used.

Future Sessions

I’ll be presenting on window functions at:
PASS Data Community Summit – November 15th to 18th. Pre recorded session and live QA on Wednesday 15th 04:00 PM–04:30 PM PST

Further Resources

Itzik Ben-Gan’s Blogs at SQLPerformance.com
T-SQL Beyond the Basics – My 2021 PASS Summit session, includes sections on window functions amongst other intermediate techniques.

How to Add a “None” Option to Power BI Field Parameters

Field Parameters are a great new addition to Power BI but a little rough around the edges. Let’s look at getting down and dirty with DAX to add a ‘none’ option.

Field Parameters are one of my favourite recent additions to Power BI. The ability to turn a single chart into potentially dozens changes the way we think about putting variations of visuals on the page. It was a real wow moment for a client recently when I showed how field parameters for 5 fields and 5 measures could produce a single report page that replaced 25 of their existing reports.

While they theoretically don’t allow you to do much that you couldn’t previously with a disconnected slicer and a lot of DAX they build it faster and without the need to get heavily in to coding DAX. Anything that lowers the difficulty bar for users trying to make the most out of Power BI is a good thing in my book.

Unfortunately being a new feature and still in preview they’re still a little rough around the edges. The big two issues for me are:

  • There’s no interface to make subsequent edits.
  • Once you pick one or more options in a field parameter there’s no way to unselect all of them or switch to a ‘none’ option.

The first can be bypassed for now by editing the DAX that appears when you select the parameter in the fields list. The second is officially not possible but I stumbled on a couple of options recently.

Option 1 – Create A None Dimension

Option 1 is a bit more work but also a little more ‘official’ as an approach. Simply add an extra dimension to the field parameter called ‘None’ based on a new single valued column.
In my test run I downloaded a copy of the Contoso sample dataset and added the following calculated column to the Calendar table (calendar seemed like a good choice as in most models it will be connected to all your fact tables).

None = "None"

After it’s in place just add it to your field parameter as you would any other field.

The up side to this approach is that it’s all above board, the down sides are that you’ve added a new column to your model and that None doesn’t actually mean nothing is selected and instead you have something called “nothing” this means with none selected your legends don’t vanish and instead you have a single item called none.

The DAX for the field parameter now looks like this:

Chart Legend = {
    ("None", NAMEOF('Calendar'[None]), 0),
    ("ChannelName", NAMEOF('Channel'[ChannelName]), 1),
    ("ContinentName", NAMEOF('Geography'[ContinentName]), 2),
    ("StoreType", NAMEOF('Stores'[StoreType]), 3),
    ("ProductCategory", NAMEOF('ProductCategory'[ProductCategory]), 4)
}

Option 2 – Getting Dirty With The Dax

I stumbled on this approach while dealing with the issue mentioned above that there’s no edit interface for the list of fields in your parameter. The only way round this if you want to add another field or change the ordering is to pull up your sleeves, select the parameter in the fields list and start changing the definition.

While I was doing this a few days ago I wondered what would happen if I changed the NAMEOF() function to be a fixed value. Lo and behold we have a none option that behaves just as you’d expect it to, pick it and we get an empty legend\column\wherever you’re using your parameter. You don’t even have to create a placeholder column.

The code from my Contoso sample now looks like this:

Chart Legend = {
    ("None", "None", 0),
    ("ChannelName", NAMEOF('Channel'[ChannelName]), 1),
    ("ContinentName", NAMEOF('Geography'[ContinentName]), 2),
    ("StoreType", NAMEOF('Stores'[StoreType]), 3),
    ("ProductCategory", NAMEOF('ProductCategory'[ProductCategory]), 4)
}

This option comes with the warning that it’s in no way a supported approach. We’re basically breaking the parameter by making it look for a field that doesn’t exist and there could be consequences I’m not aware of. If you fel this is too much of a risk then stick with option 1.

SQLBits Buddies

Looking to get the most out of SQLBits? Why not find yourself a Bits Buddy.

Big conferences like SQLBits can be intimidating, they can feel like you’re walking into a room of a thousand strangers all of whom have known each other for years. That at least was how my first SQLBits felt. I’d driven down to Telford early one Saturday morning and slipped into a session about five minutes after it had started, dropped in to a few more, awkwardly ate lunch in a corner, talked briefly to the one former colleague I recognised and then headed for home. It wasn’t terrible but equally I didn’t feel like I’d had the full SQLBits experience.

The year after I was attending for the full conference and determined to get the most out of it, I knew a few people from other events and had managed to secure the funding to bring along a few my team from work.
Keen to make an impact early we’d travelled into central London the day before the conference for a Q&A session with some of the Microsoft team. I figured now was the time to put on my best impersonation of a sociable individual and headed over to someone who occasionally dropped into the local user group who was chatting with an unfamiliar face in the corner.
Reaching a suitable pause, I mentioned that I was looking forwards to my training days, how exciting it was having face to face training with someone whose book had sat on my desk for the last year and enquiring of my acquaintance’s conversation partner (I’d failed to catch his name) which sessions he was booked in to. He politely let me know his name and explained he was leading one of the training days, mine in fact.

Chances are you won’t have to put your foot in it quite as far as I did to start up a conversation, but to make getting to know a few more people at SQLBits even easier this year they’ve introduced the Bits Buddies team and I’m one of them. We’ll be sporting the usual volunteer’s orange shirt but with an extra armband to show that we’re extra keen to have a chat, help find you a team for the Thursday night quiz or, point you towards others who are heading out in the evening for your food or drink of preference. Do say hello if you see us about between sessions or hanging out at the community corner. There are also online drop-in sessions planned for the next week if you have any questions beforehand.

You’re also welcome to get in touch with me in advance, you can find me at twitter or LinkedIn or keep an eye out for me in person in London. I’ll talk about pretty much anything if you’re after a conversation starter I’m a BI developer by trade with time working in the NHS, social care, and travel industries. Outside of work subjects that will likely spark a interest are films, running, living with young humans (3 & 9), comics, the joys and pains of adopting a child, board games and dad jokes.
If none of those are your thing, then pick another subject or alternatively there’s plenty more of us to choose from.

SSMS Tips and Tricks: The Amazing Alt Key

Once you know how to use it the Alt key is almost magical, reducing many tedious typing tasks down to a handful of clicks and keystrokes.

I went years without knowing how useful the Alt key was, it’s not well documented but I can guarantee that once you know about it and give it a little practice you won’t be able to live without it.

While I’m filing this under SSMS Tips and Tricks but it works equally in Visual Studio, VS Code, Azure Data Studio and even Notepad ++ (but not plain old vanilla notepad). It’s worth a test in other places too.

What does the Alt Key Do In SSMS?

Holding down the Alt allows you to select an arbitrary block in a text entry area. With that done you can act on the entire selection e.g. by typing, copying, or pasting.

My most common use is adding commas. Have you ever had a list of field names or values that you need to be comma separated? Perhaps you’ve used the Alt + F1 keyboard shortcut to list fields in a table and now you want them in a SELECT statement. Perhaps you have a list of row identifiers of test cases in a large data set that you want to drop into an IN operator so you can see the results. Whatever the need, at some point you’ve probably sat pressing the down arrow and comma key over and over thinking there must be an easier approach (I used to do this kind of stuff in Excel before I knew better).

With the Alt key you can just select every row and type your text into all of them at the same time. A picture is worth a thousand words so here’s an animated gif of the process in action.

Using the Alt key to select multiple rows and type the same values on all of them.

How Does the Alt Key Affect Copying and Pasting?

Alt also allows you to vary how you copy and paste. A normal multi line copy in the clipboard combined with Alt to select multiple rows results in those multiple rows being pasted multiple times. Not often useful unless you want to generate a lot of lines of text quickly.
If you hold down the Alt key to select your copy area then the multiple select is remembered and it fills downward when pasting. Again, this is easier illustrated than described.

Using the Alt key to select multiple rows of text and then paste them to a different location.

Putting It All Together

Once you understand the behaviour you can start to put this together to do something more advanced, this comes in handy where you need to apply the same function to multiple fields and then also need to give those fields unique names. It’s a common and tedious process without the Alt key. With it we can type on multiple lines at the same time for the function and then paste to multiple rows for the field name. The final process looks like this.

Using the Alt key to wrap text in a function and then add the copy and paste the field name for each row.

I couldn’t live without the Alt key now and after a bit of practice doing things like the above are now so embedded into my muscle memory they just happen as I write queries. It’s well worth the effort to get to that point in my opinion, I’m a big fan of anything that reduces a dull task to something quick.

SSMS Tips and Tricks: Custom Keyboard Shortcuts

Why limit yourself to the built in SSMS shortcuts when you can build new ones for yourself?

One of the first things I do when faced with a fresh install of SQL Server Management Studio is to set up a couple of custom keyboard shortcuts.
You’ll find this feature in Options under the Tools menu and then by navigating through Environment > Keyboard > Query Shortcuts

Screenshot of query shortcuts section of SSMS options.

The screenshot above shows my usual additions to the defaults:

Under Ctrl + F1 ‘SELECT TOP 100 * FROM ‘
Under Ctrl + 3 ‘SELECT COUNT(*) FROM ‘

The trailing spaces are important, this won’t work without them.

Feel free to fill in any of the gaps if you’d prefer a different shortcut or one of the above causes issues (I like Ctrl + F1 as it’s easy to hit with one hand but on some machines it ignores the Ctrl and opens up a help page). I’ll assume you’re using the same as me for the rest of this blog.

Once set up, we can open up a new query window and give them a test (they may not be applied to windows already open). How these work is that specified value gets appended to whatever text you have and run as a query. So selecting a table inside a query and hitting our new shortcut gives us either the top 100 rows or a count of rows.

Peeking At Data With Ctrl + F1

Here’s my Ctrl + F1 in action, note how I can use anything that’s valid after a from clause, it can be multiple columns and WHERE clauses too.

Using our new Ctrl + F1 shortcut to peek ad data sets

I use this any time I need to peek at what’s in some table(s) while I’m writing a query to get a feel for the data and to remind me of what’s where.

You don’t have to stick to a TOP 100 in this shortcut but be warned if you get any bigger then things will get slower as there appears to be some sort of performance optimisation applied to values of 100 or below.

Grabbing Metadata With Alt + F1

Recently I’ve become a fan of the built in Alt + F1 option as well, it calls sp_help which amongst other things lists indexes, column names and data types. Don’t have a fancy tool to expand SELECT * into column names? Just use this shortcut and copy and paste from the results.

Counting Rows With Ctrl + 3

The need to count rows comes up a lot for me. Is this a big table I need to be careful with or a smaller table but the real power of this shortcut comes from it’s ability to count across joins.
Have you ever been in a scenario where you have multiple joins and you know one of them is introducing duplicate rows but not which one? Use this to count your starting table and then steadily expand your selection to include more tables until the count changes.
Here’s a simple demo, imagine I wanted customers and their first purchase but it hadn’t dawned on me that a customer might buy more than one item at the same time.

Using our new Ctrl + 3 to get row counts from parts of a query

The above can of course become quite slow if you’re counting a lot of rows but that’s what the cancel query button is for right?

Ctrl + 4 to Ctrl + 0

That leaves a lot of empty spaces that I’m sure can be put to a creative use, I’d love to hear suggestions for other useful shortcuts. The only real limitations are the text needs to fit on a single line and as it must be prefixed on to the selected text and executed we’re looking at simple SQL statements and stored procedures that take a single (or no) parameter.

Feel free to drop suggestions into the comments.